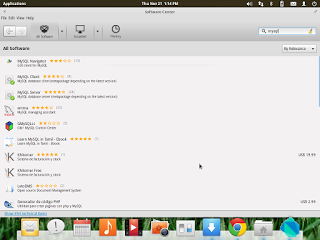
I have tried to make friends with Dart several times already. Unfortunately, as a mere replacement for JS it seemed a bit unnecessary to me, but now that you can also write Chrome Packaged Apps and console applications in Dart, whose output is printed in the Dart Editor (or surely somewhere in Chrome if the Dart Editor is not running), I decided to learn it. Today we will not look at a Hello World program, but at something a little more complex: working with a MySQL database. I am on Linux right now, on Elementary OS Luna, so the screenshots will come from it. However, as far as Dart itself is concerned, everything should be the same on all platforms and OSes. The first thing we have to do is install MySQL, if you do not have it yet. I did it the easiest way, through the Software Centre:
sudo /usr/bin/mysql_secure_installation :

sunamo@m:~$ sudo /usr/bin/mysql_secure_installation

[sudo] password for sunamo:

NOTE: RUNNING ALL PARTS OF THIS SCRIPT IS RECOMMENDED FOR ALL MySQL

SERVERS IN PRODUCTION USE! PLEASE READ EACH STEP CAREFULLY!

In order to log into MySQL to secure it, we'll need the current

password for the root user. If you've just installed MySQL, and

you haven't set the root password yet, the password will be blank,

so you should just press enter here.

Enter current password for root (enter for none):

OK, successfully used password, moving on...

Setting the root password ensures that nobody can log into the MySQL

root user without the proper authorisation.

Set root password? [Y/n] y

New password:

Re-enter new password:

Password updated successfully!

Reloading privilege tables..

... Success!

By default, a MySQL installation has an anonymous user, allowing anyone

to log into MySQL without having to have a user account created for

them. This is intended only for testing, and to make the installation

go a bit smoother. You should remove them before moving into a

production environment.

Remove anonymous users? [Y/n] y

... Success!

Normally, root should only be allowed to connect from 'localhost'. This

ensures that someone cannot guess at the root password from the network.

Disallow root login remotely? [Y/n] y

... Success!

By default, MySQL comes with a database named 'test' that anyone can

access. This is also intended only for testing, and should be removed

before moving into a production environment.

Remove test database and access to it? [Y/n] n

... skipping.

Reloading the privilege tables will ensure that all changes made so far

will take effect immediately.

Reload privilege tables now? [Y/n] y

... Success!

Cleaning up...

All done! If you've completed all of the above steps, your MySQL

installation should now be secure.

Thanks for using MySQL!

Then log in to MySQL:

sunamo@m:~$ mysql -u root -p

Enter password:

Welcome to the MySQL monitor. Commands end with ; or g.

Your MySQL connection id is 57

Server version: 5.5.34-0ubuntu0.12.04.1 (Ubuntu)

Copyright (c) 2000, 2013, Oracle and/or its affiliates. All rights reserved.

Oracle is a registered trademark of Oracle Corporation and/or its

affiliates. Other names may be trademarks of their respective

owners.

Type 'help;' or 'h' for help. Type 'c' to clear the current input statement.

And then find out which databases you have:

mysql> show databases;

+--------------------+

| Database |

+--------------------+

| information_schema |

| mysql |

| performance_schema |

| test |

+--------------------+

4 rows in set (0.00 sec)
mysql> use test;Database changed
mysql> show tables -> ;
Empty set (0.00 sec)
mysql> CREATE TABLE Users(ID VARCHAR(32), Name VARCHAR(32), Surname VARCHAR(32), DateBorn DATE);
Query OK, 0 rows affected (0.18 sec)
…insert some data into it – 2 rows, so we can see that any number of rows can be fetched…
mysql> INSERT INTO Users VALUES (1, "Radek", "Palarcik", -> "1993-4-2");
Query OK, 1 row affected, 1 warning (0.18 sec)
mysql> INSERT INTO Users VALUES(2, "Nikol", "Palarcikova", "1989-06-21");
Query OK, 1 row affected (0.08 sec)
…and take a look at how the data was stored. Since I am a beginner in MySQL, I do not know yet how to set up Czech collation, which is why it shows Jan?ik.
mysql> SELECT * FROM Users;

+------+-------+-----------+------------+

| ID | Name | Surname | DateBorn |

+------+-------+-----------+------------+

| 1 | Radek | Palarcik | 1993-04-02 |

| 2 | Nikol | Palarcikova | 1989-06-21 |

+------+-------+-----------+------------+

2 rows in set (0.00 sec)
Now let’s move on to Dart. Create a new Console Application project (I named mine DartLearn). Open the pubspec.yaml file, add the sqljocky package to the dependencies and save it (ctrl+s). The workspace will be rebuilt, which may take a moment.
Then replace the contents of the generated Dart file with the following (if you unchecked the option to generate sample content, you will of course have to create this file yourself (ctrl+n)): RIP – this server did not even survive its own hosting.. The last thing you need to set up is a launcher so that you can run this program. Press ctrl+shift+m and set up a launcher for your console application and your script:
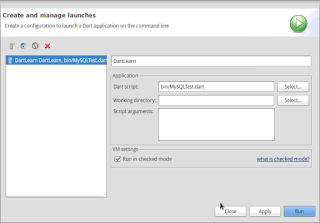
Originally I wanted to build this as a web application, but just setting up the launcher made Dartium throw the error “The built-in library
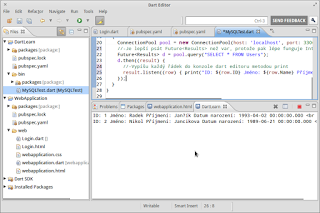
dart:io is not available on Dartium.”, and I did not manage to install Apache on Linux through the software manager (I did not try Synaptic). The point is that dart:io is a server-side library intended for the server only. Run it (ctrl+r) and you should see the data from your MySQL DB in the console:
Good luck with Dart.