Commands in WPF are very handy, especially when you need to map a keyboard shortcut using KeyGesture (there is also a MouseGesture class, which likewise inherits from InputGesture, so it might be possible to create some kind of mouse gesture, although I have never come across that; I would guess it is something like a left mouse button click + a key on the keyboard), or when you need to automatically enable / disable a button or anything else that can be mapped to a command. All you have to do is write the CanExecute method of the CommandBinding class, which is then called automatically roughly every 500ms and enables / disables, for example, a button.
So how do you create a simple command?
The first step is to create a class with any name you like (I always use {program_name}Commands). In it, create instances of the RoutedCommand class, which takes a name as its first parameter (which, however, I have never used so far), followed by the name of any class that is in the namespace in which you will be using this command.
These were the 2 required parameters, but the class constructor takes 3 in total. For me, both the parameterless constructor and the constructor with the 2 parameters mentioned above plus a 3rd one, which specifies input device shortcuts (keyboard, mouse), worked fine.
using HostingManager;
/// <summary>
/// This class exists only to declare Commands in it, which you will then use in XAML
/// </summary>
using System.Windows.Input;
namespace HostingManager
{
    public static class HostingManagerCommands
    {
        /// <summary>
        /// The command we will always refer to in the Command property
        /// </summary>
        public static RoutedCommand RunThread = new RoutedCommand();//"commandRunThread", typeof(MainWindow), new InputGestureCollection(new KeyGesture[] { new KeyGesture(Key.S, ModifierKeys.Control) }));
}
}
Then add the namespace, ideally to the root tag of your XAML file. In my case that is Window, and I named the namespace src. I think you should already have this namespace there, so just check it first
xmlns:src="clr-namespace:HostingManager"The next step is to create the wrapping element Window.CommandBindings right after the opening tag Window:
<Window.CommandBindings>
<CommandBinding Command="src:HostingManagerCommands.RunThread" x:Name="cmdRunThread" CanExecute="cmdRunThread_CanExecute" Executed="cmdRunThread_Executed"> </CommandBinding>
</Window.CommandBindings>
Next, you need a button that we will automatically enable or disable and a ListBox into which we will count, because we will be using threads:
<StackPanel Orientation="Vertical">
<Button x:Name="btnCancelUpload" Command="src:HostingManagerCommands.RunThread">
<Image Source="Run.png" Width="16" Height="16"> </Image>
</Button>
<ListBox x:Name="lbLog"> </ListBox>
</StackPanel>
Since we will be using threads, you need to define a class containing a delegate pointing to a method that adds objects to the ListBox:
using System.Windows.Controls;
public delegate void insertToListBoxWpf(ListBox listBox, int index, object o);
public partial class IHWPF
{
    public static insertToListBoxWpf delegateInsertToListBoxWpf = new insertToListBoxWpf(insertToListBoxWpfValue);
    public static void insertToListBoxWpfValue(ListBox listBox, int index, object o)
    {
        listBox.Items.Insert(index, o);
    }
}
Finally, just write the CanExecute, Executed and OnLoad methods in the code-behind of the Window class, and also create a global Thread variable so that we can start this thread and check whether it is alive, each in a different method:
Thread thread = null;
public MainWindow()
{
    this.Loaded += MainWindow_Loaded;
}
void MainWindow_Loaded(object sender, RoutedEventArgs e)
{
    thread = new Thread(Run);
    thread.Start();
}
void Run()
{
    for (int i = 0; i < 5; i++)
    {
        Thread.Sleep(1000);
        Dispatcher.Invoke(IHWPF.delegateInsertToListBoxWpf, lbLog, 0, i.ToString());
    }
}
private void cmdRunThread_Executed(object sender, ExecutedRoutedEventArgs e)
{
    Dispatcher.Invoke(IHWPF.delegateInsertToListBoxWpf, lbLog, 0, "The thread was started again");
    thread = new Thread(Run);
    thread.Start();
}
/// <summary>
/// Once the thread finishes, this method sets e.CanExecute back to True
/// </summary>
/// <param name="sender">
/// <param name="e">
private void cmdRunThread_CanExecute(object sender, CanExecuteRoutedEventArgs e)
{
    bool canExecute = true;
    if (thread != null)
    {
        canExecute = !thread.IsAlive;
    }
    e.CanExecute = canExecute;
}
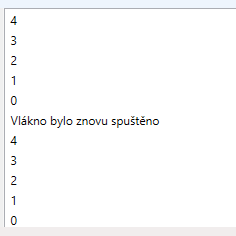
The result? The button could not be clicked while the thread was running